Category: Tutorial

  • How To Make Creative Button Hover Animation In Elementor? (2 Ways)

    How To Make Creative Button Hover Animation In Elementor? (2 Ways)

    Hey everyone, and welcome back to another WordPress tutorial. Today we’re going to learn how to create creative buttons with cool hover animation effects and a modern look. 

    For this hovering animation tutorial, we’ll use the Hello Elementor theme with the free version of Elementor. You’ll notice I have two paid plugins installed. Don’t worry, I’ll explain where and why we use them later on. Let’s get started!

    Method 1: Create Elementor Button Hover Animation with CSS

    • First, create a new page and name it Creative Buttons. 
    • Then, go to Page Settings, hide the title, and change the page layout to Elementor Canvas. This gives us a clean slate with no header or footer, but if you want to keep those, that’s totally fine too.
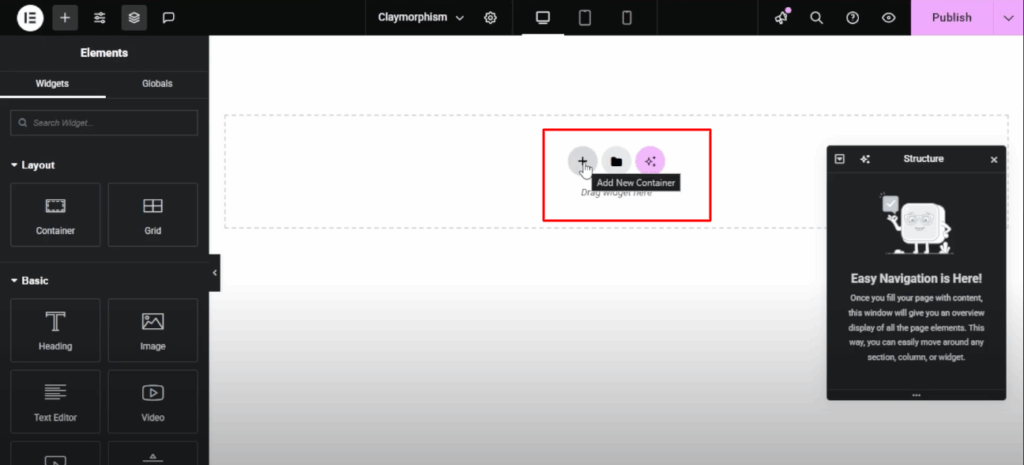
    • Now, let’s start designing. Add a container to the page and set the minimum height to 50vh. Center the content by setting both Justify Content and Align Items to Center. 
    • Next, drag in a button widget. You can change the button text and color later. 
    • Go to Advanced Settings and add a CSS class named BWDBTN. 
    • Now click Publish and hit Preview to see it in action.
    • Next, click Customize, then go to Additional CSS. Here, we’ll paste in the CSS code, which you can find below. 
    • Once added, you’ll see we now have a nice, shiny button with smooth hover effects and animated text transitions. 
    • But it’s not perfect yet. Notice there’s too much padding and spacing. Let’s fine-tune that.
    • First, publish the changes, then go back to the Elementor page builder and reload the page. Now select the button, click Edit, and head over to the Style Settings. 
    • Make the background color transparent. Change the typography to Poppins, set the font weight to 400, normal, and keep the transform to default. If the text looks too small inside the button or leaves gaps, try changing it. 
    • For example, if you type Book a Meeting, the spacing will improve. However, if you add too much text, it might overflow or break into two lines. Let’s test it. 
    • Click Publish, then Preview again. As you can see, when we hover, the text wraps into two lines, not ideal.
    • To fix this, go back to Customize, Additional CSS. Look for the left and right padding, currently set to 6.5, and adjust it according to your text size. 
    • After tweaking, the button now fits the text perfectly. Click Publish, and we’re done with the manual part.

    Method 2: Hover Animations Behind a Button Using Plugin

    Now earlier, I mentioned the BWD Elementor Add-ons and BWD Elementor Add-in Pro. Why do we need them for hovering animation? Well, while custom CSS gives us full control, it can be time-consuming and requires tweaking. 

    But with these plugins, you can easily create and customize classy button hover animations. No CSS required. Let me show you how.

    First, go to bestwpdeveloper.com and download the BWD Elementor Add-ons. They offer both free and pro versions. Since I’ve already installed it, I’ll just search for the widget named Creative Buttons and drag it into a new container. 

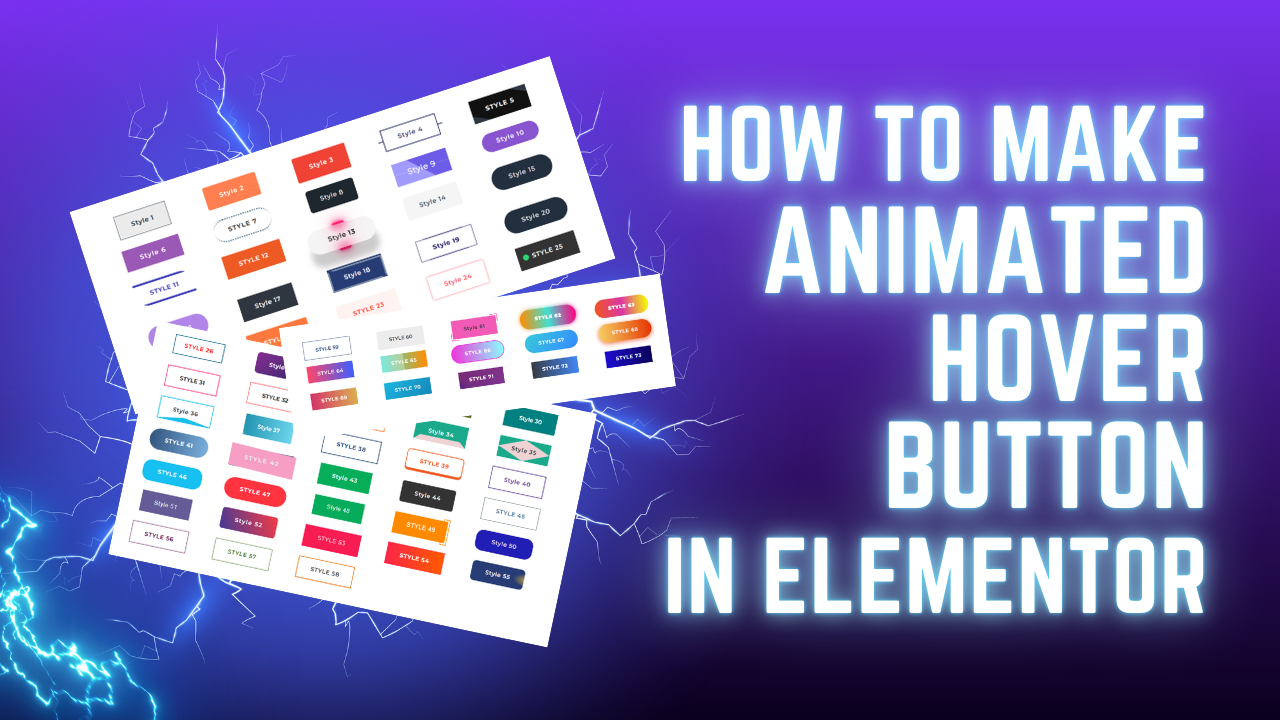
    As you can see, there are 100 plus pre-designed button styles ready to go. Simply select your favorite style, and with one click, your button design changes instantly. You can also customize colors, icons, hover animation effects, and more, right from the Elementor panel. 

    If you’re just getting started, try the free version first. And if you like it, upgrade to the Pro to unlock all the styles.

    And that’s it for today’s tutorial. You now know how to make creative hover animation buttons manually with CSS, and quickly with the BWD plugin. Thanks for reading, and I’ll see you in the next tutorial. You can also check our previous tutorial.

    Download the code here.

    [lead-magnet id=”3″]

  • How To Make Meet The Team Section In WordPress?

    How To Make Meet The Team Section In WordPress?

    Hello everyone, and welcome to another WordPress tutorial. Today we’re going to learn how to create a meet the team member page, just like this. It’s a simple and beautiful meet the team design ideas layout that you can use for multiple team members.

    Method 1: Elementor Meet the Team Page Design with CSS

    To build this meet the team design, we’ll use the free theme Hello Elementor and the free version of Elementor Pro. Alright, let’s get started.

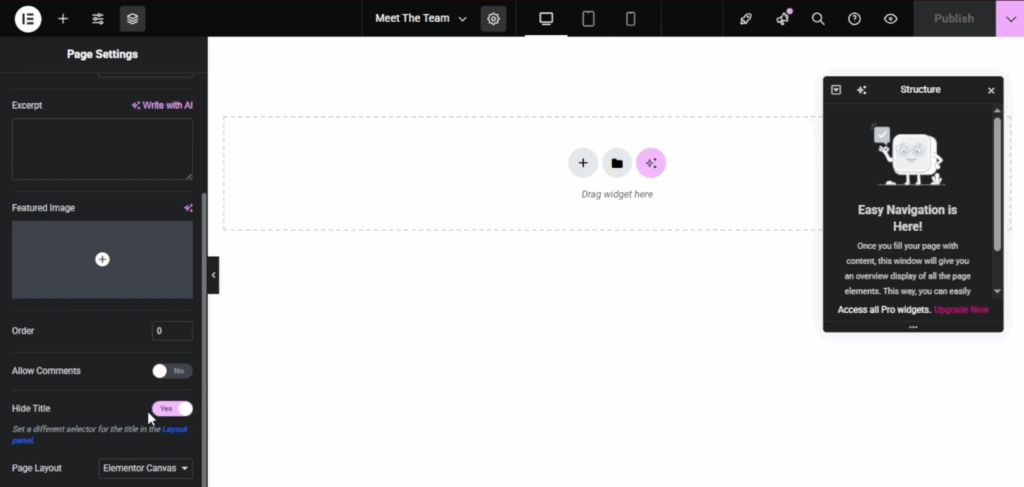
    • First, create a new page. From the page settings, hide the page title and change the page layout to Elementor Canvas. This way, the header and footer will be hidden. 
    image 68
    • Now we’ll add a container. Set the minimum height to 70VH. Change the direction to horizontal and set align items and justify content to center.
    image 69
    image 70
    • Next, we’ll add another container inside this one. This will act as our inner column. Now, duplicate this container until you have four columns. Let’s select one of these to start designing.
    image 71
    image 72
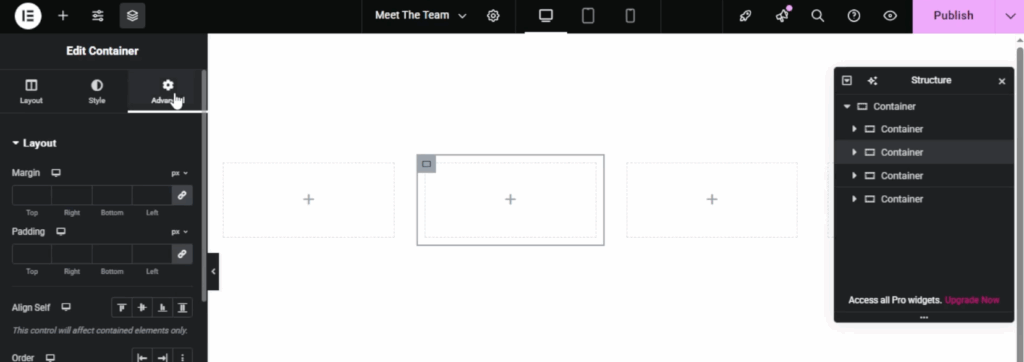
    • First, go to advanced settings and set the padding: Top: 30; Bottom: 40; Left and Right: 0
    image 73
    image 74
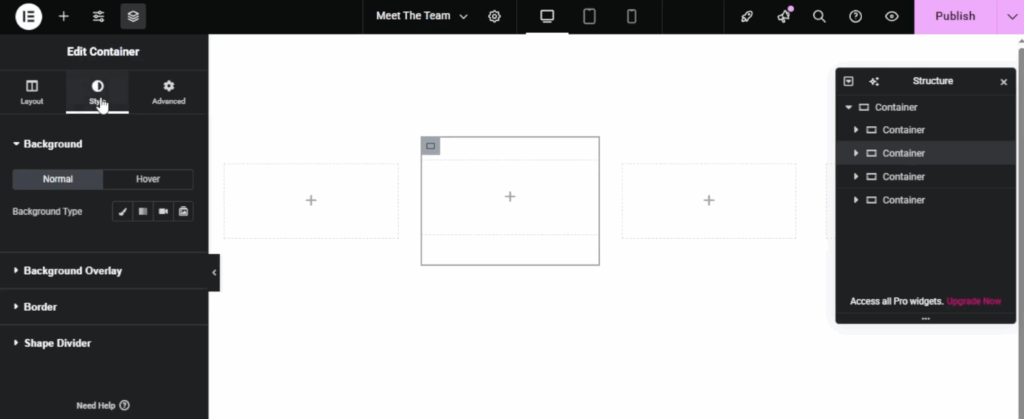
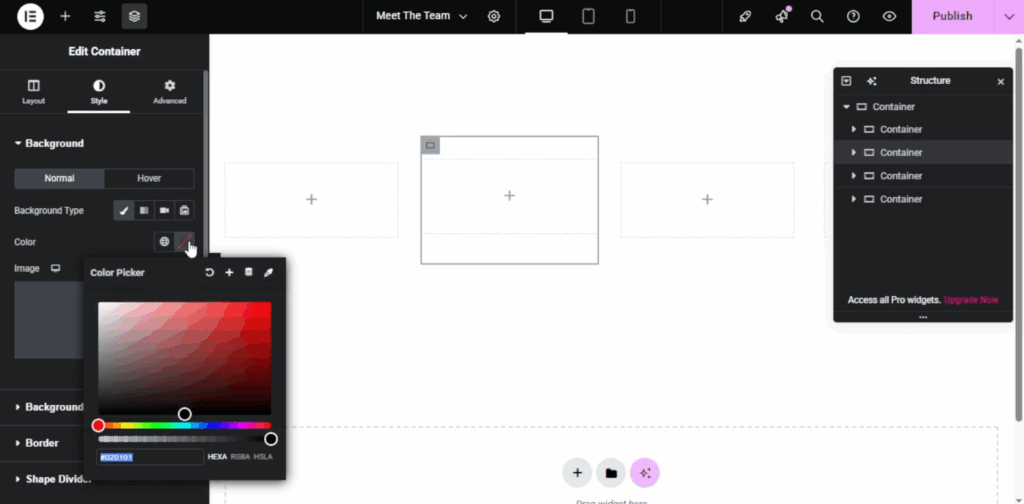
    • Then, head over to style settings and apply a background color. The color codes, along with all CSS used in this tutorial, are available in the description box.
    image 75
    image 76
    • Now, let’s set the border radius to 5 pixels on all sides.
    image 77
    • Inside this column, add another container. Set align items to center. Then, under advanced settings, set the padding to: Right: 25; Left: 25; Top and Bottom: 0.
    image 78
    image 79
    image 80
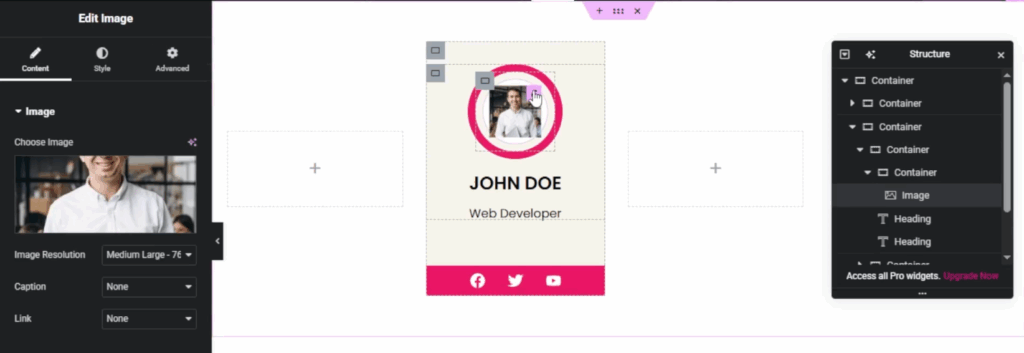
    • Next, add another container inside for the image. Set the padding to zero. Now, drag in an image widget. Set the image resolution to medium large for faster loading. Upload your team member’s photo, ideally 300 by 300 pixels.
    image 81
    image 82
    image 83
    image 84
    image 85
    • Now, let’s add a CSS class to this image. Name it Sager Profile Image. Then, select the container holding the image and add another CSS class, Sager Profile Background. Now, select the main inner container and add one more CSS class, Sager Profile Main.
    image 86
    • Great. Now let’s add the text. Drag a heading widget below the image container. Move the image container above if needed. For the team member name, type something like John Doe. 
    image 87
    image 88
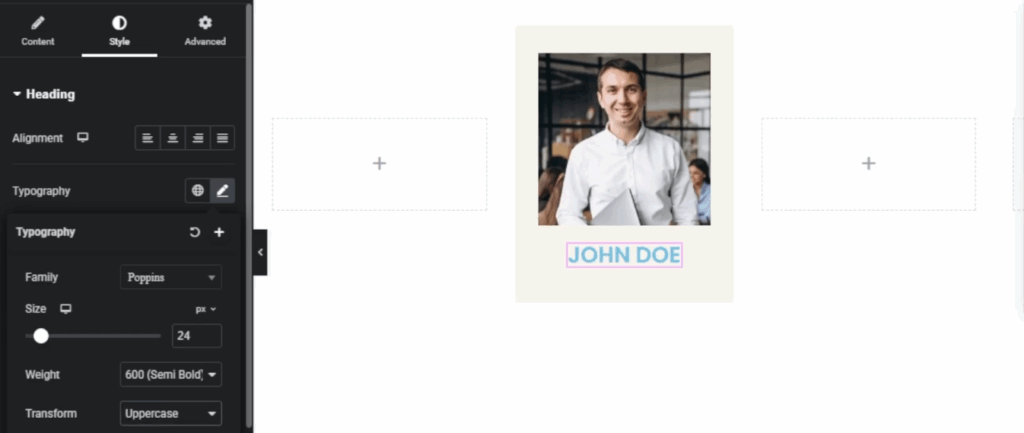
    • Then, set the typography to Poppins size, 24 pixels, weight 600, semi-bold, and uppercase. 
    image 89
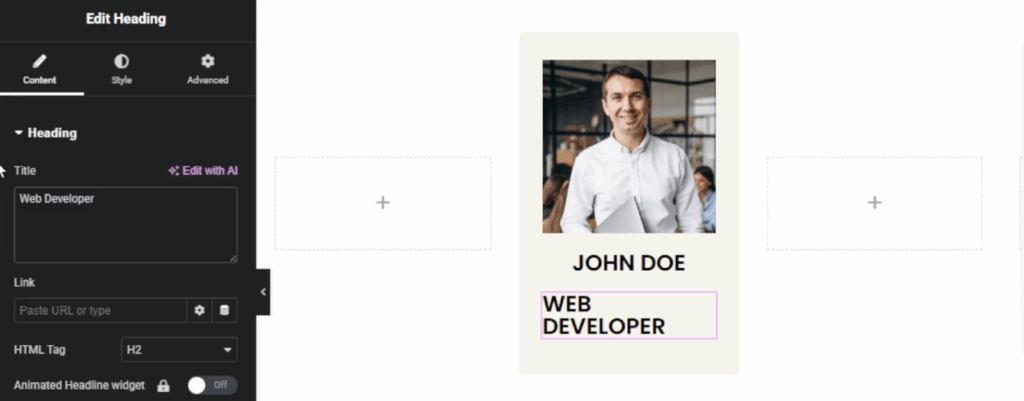
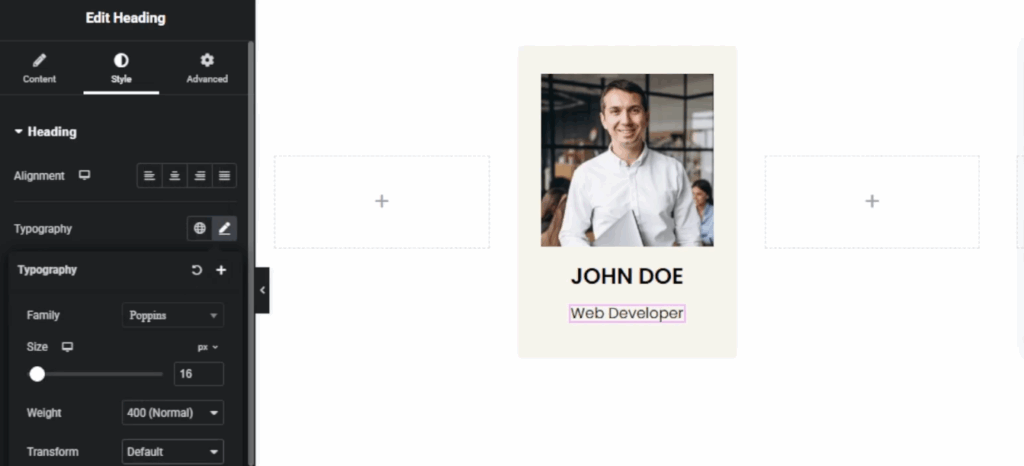
    • Change the text color to black. Duplicate this heading to add the designation, for example, web developer. Here, change the font size to 16 pixels, weight to 400, normal, and set the transform to default.
    image 90
    image 91
    image 92
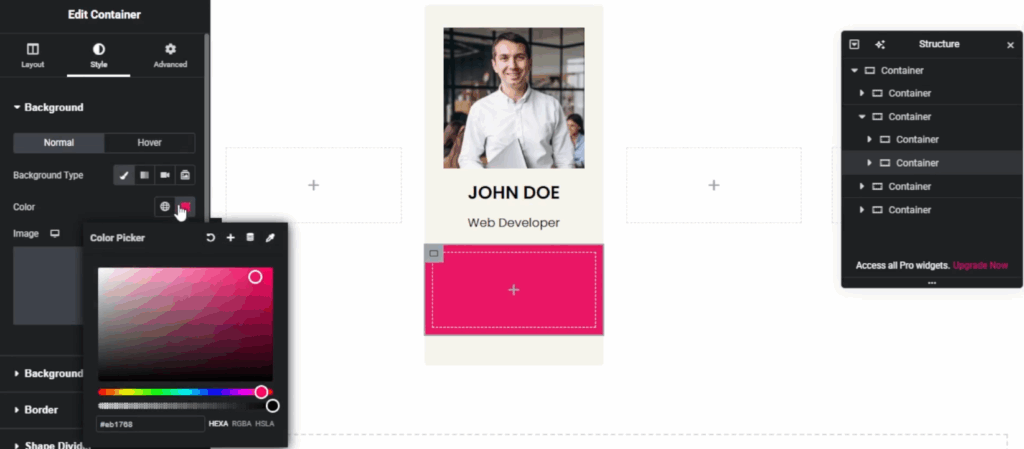
    • Now, let’s create a section for social media icons. Add another container below the designation. Set a background color for this container and add a CSS class, Sager Profile Icon.
    image 93
    image 94
    image 95
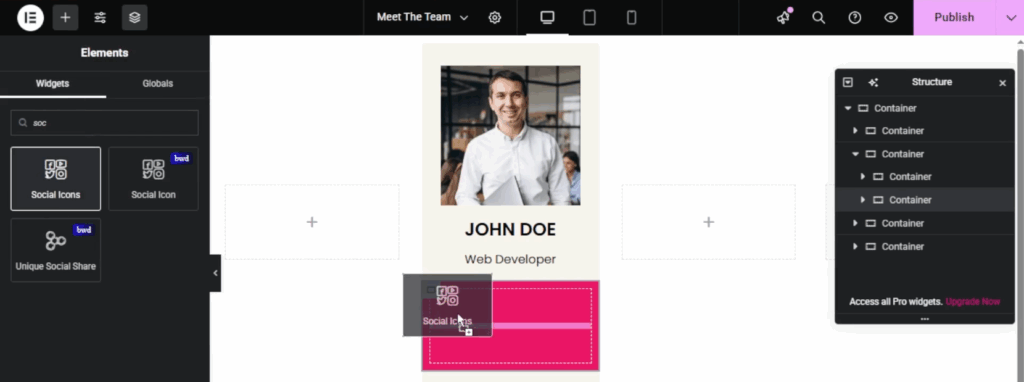
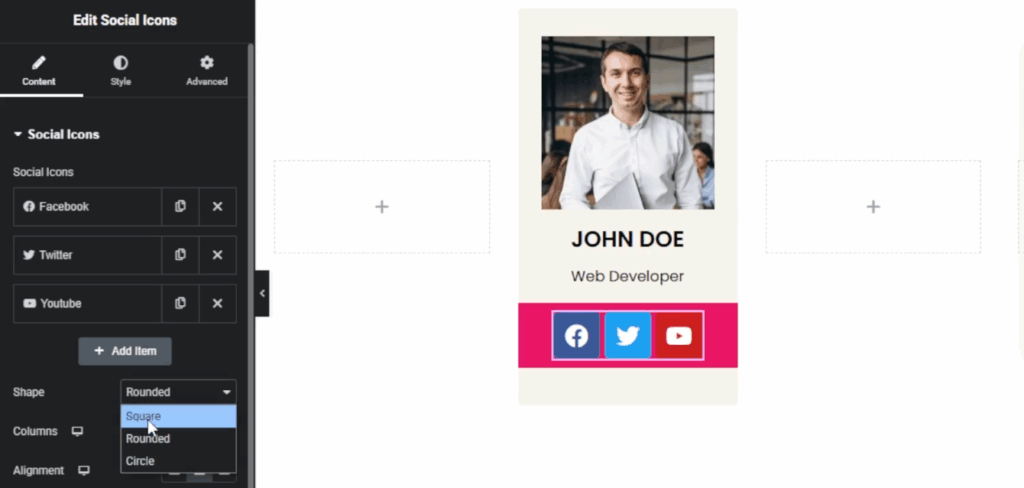
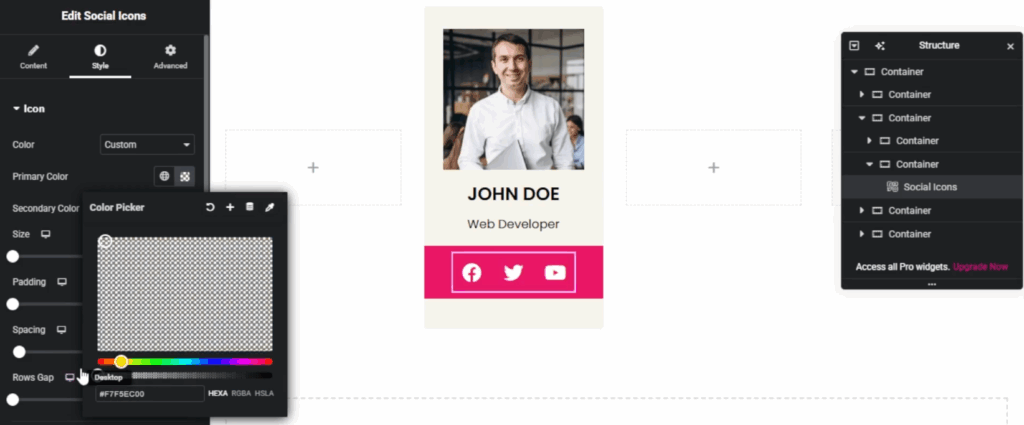
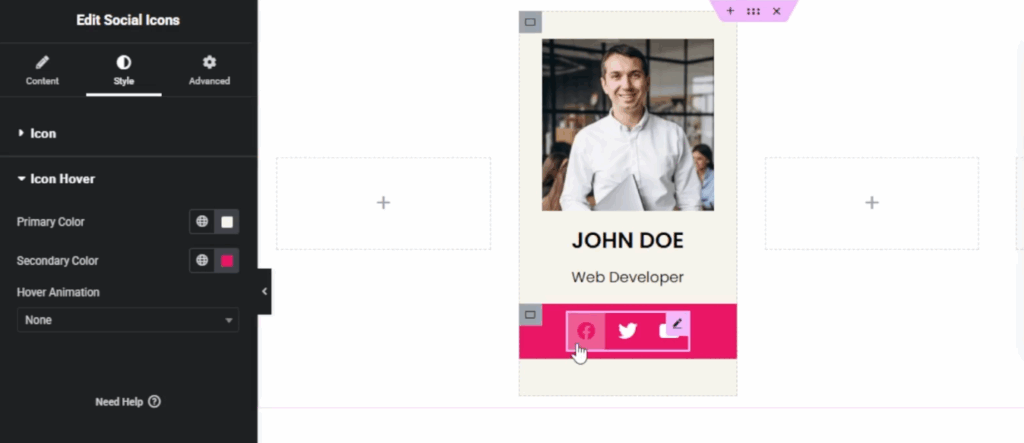
    • Align items to center and add the social icons widget inside. Change the shape to square. In style settings, set the color to custom and make the primary color fully transparent.
    image 96
    image 97
    image 98
    image 99
    • Adjust the icon size to 20 pixels. Now, under icon hover settings, change the primary color to match your background color and set a secondary color if needed. 
    • Also, adjust the icon spacing to 10 pixels and set all padding of the container to zero.
    image 100
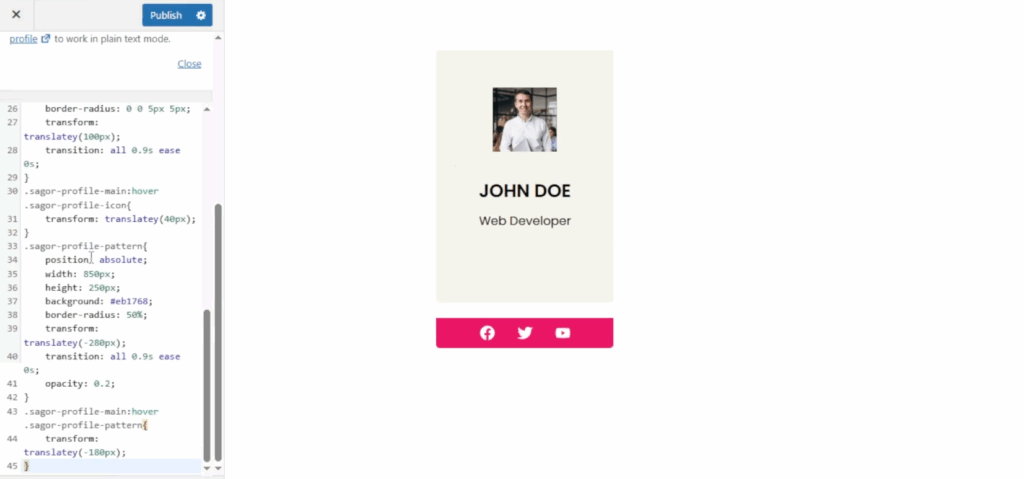
    • Alright, click publish and let’s preview the page. Now, let’s move on to some custom CSS. Go to customize, then additional CSS and paste the CSS code you’ll find in the description box. 
    image 101
    • As you can see, the page looks even better now with some smooth effects, but we still need to adjust a few things. Click publish, then reload the page.
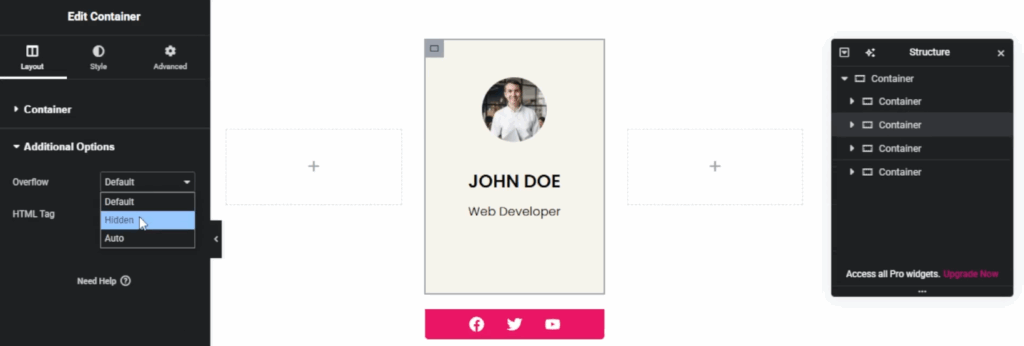
    • Now, to make the profile picture circular, select the image container and set the border radius to 50%. Set the overflow to hidden under advanced settings. Next, we’ll work with the Sager Profile Pattern class. 
    image 102
    image 103
    image 104
    • Add a spacer widget outside the inner container and give it the CSS class, Sager Profile Pattern. Now, when you hover over a profile, you’ll see a cool pattern effect appear. Almost done. 
    image 105
    • Now, duplicate the finished. Pattern effect appear. Almost done. Now, duplicate the finished column to create three more team member profiles. Remove any old empty columns if needed. 
    • Click publish and preview again. And there you go, your beautiful, mobile responsive team member page is ready. You can easily change the photos, names, and designations as needed.

    Quick tip: if you don’t have the time to build everything from scratch or want even more designs, you can use a plugin. Visit https://bwdelementoraddons.com/ where you’ll find addons like “Meet The Team”. 

    Method 2: How to Create a Meet the Team Page in WordPress Using Plugin?

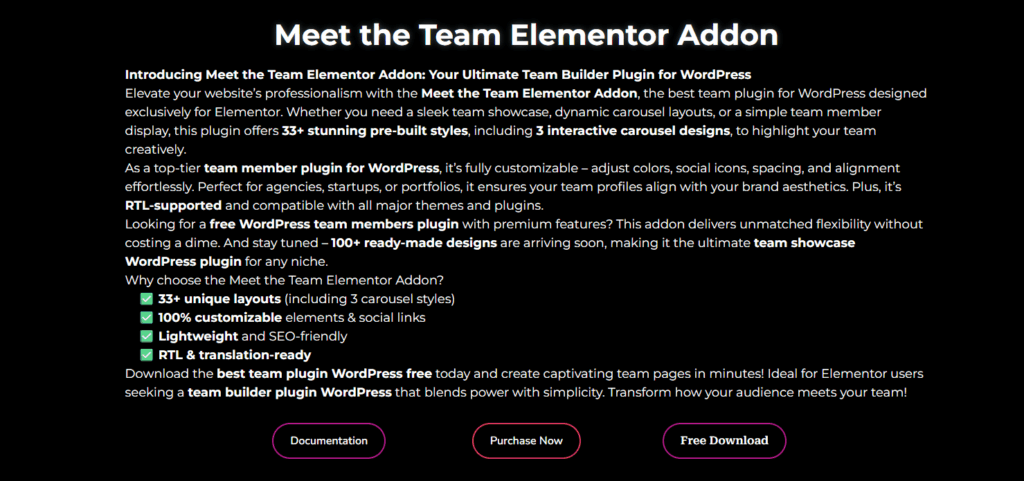
    This plugin offers two free team member designs, and I’ve already installed it to show you. After installing, simply search for “Meet the Team” in the Elementor widgets, drag it onto your page, and your team section is instantly created. 

    image 106

    You can easily customize it and you can also choose from over 30 plus different team styles. Just a single click and your entire design changes. It’s a huge time saver if you want more styling options without starting from zero.

    That’s it for today’s tutorial. Thanks for watching and I’ll see you in the next video.

    Installation Process of “BWD Meet The Team Elementor Addon”

    • Install Meet The Team Elementor Addon using WordPress plugin installer or by uploading its files into the WordPress plugins directory.
    • Activate the Meet The Team Elementor Addon through WordPress Plugins menu.
    • Click the Plugins => Add New
    • Click Upload Plugin and then Choose the meet-the-team.zip from your computer then click on the Install Now button.
    • After activating, it doesn’t work without Elementor Page Builder plugin. Firstly, you should activate Elementor Page Builder.
    • To activate newly installed plugin navigate the Plugins => Installed Plugins.
    • Find the Meet The Team Elementor plugin from the list and press/click Activate.
    • Congratulations! plugin has been installed and activated on your website.

    Check different styles of Meet The Team and choose the style you want. Simple!

    You can also check our BWD Elementor Addons Bundle from CodeCanyon. Buy the plugin now!

  • How To Make Awesome Animated Button In WordPress? (2 Ways)

    In today’s fast-paced digital world, a simple static button just won’t cut it. Button animations are the secret sauce to grabbing attention, boosting engagement, and guiding visitors to take action on your WordPress website. 

    Whether you want to highlight a “Buy Now” call-to-action, draw eyes to a newsletter signup, or add a playful touch to your navigation, animated buttons can transform user interactions from mundane to memorable.

    In this article, we’ll walk you through two methods of hwo to make an animated button for WordPress Elementor:

    • Using a Page Builder (Elementor) and CSS Code
    • Using an addon

    Let’s dive in and turn those bland buttons into dynamic design elements that elevate your site’s user experience!

    Method 1: Elementor Button Animation Using Elementor Page Builder and CSS Code

    This method is for professionals who know custom coding and have advanced knowledge. But, if you are a beginner and don’t have any coding knowledge you can directly move to Method 2.

    • First, we’ll create a new page. Let’s name the page Animated Awesome Button. Now click Publish, then click on Edit with Elementor. From the page settings, turn on Hide Title and set the page layout to Elementor Canvas to hide the header and footer.
    • Next, we’ll add a container and change the minimum height to 100%. Set both Justify Content and Align Items to Center.
    • Now, let’s change the background color. All the color codes used in this tutorial, along with the CSS and JavaScript code, are provided in the below file.
    • Now we’ll add a button widget and name it Awesome Button. Go to the Style tab and set the typography font to Poppins. Change the font size to 18 pixels, the font weight to 400 normal, and set Transform to Uppercase.
    • Next, we’ll add a background color to the button and a hover color. Again, color codes are in the description. Change the text color to white and update the padding as follows: Left: 30; Right: 20; Top: 20; Bottom: 20. Feel free to adjust the padding based on your preference. Now, click Publish and preview the changes.
    • Next, we’ll add some custom CSS. We’ll name the CSS class Awesome Button. Now we’ll inspect the page. As we can see, there’s an anchor element with two span tags inside. We’ll use these to write our JavaScript.
    • To add JavaScript, we’ll use Elementor Pro, but you can also use a free plugin that allows custom scripts.
    • From Elementor, go to Custom Code, then click on Add New Custom Code.
    • Let’s title it Awesome Button. Set the location to Body End. Set the priority to 10 and make sure Always Load Query is checked. Now, paste the JavaScript code. You’ll find it in the description box. This script adds four more span elements to our button. Click Publish and a Publish Settings menu will appear. 
    • Here, specify the page or path where the code should apply, since we don’t want it running on the whole website. Then, click Save and Close.
    • Reload the page and check if the code is working. You should now see four extra spans added under the Awesome Button text. 
    • Next, go to Customize, then to Additional CSS. Copy and paste the CSS code there. You’ll find it in the description box. We’re doing this directly in the theme, so we can see a live preview. Before running the CSS, add a comment so you’ll know what the code is for.
    • After applying the CSS, you’ll see four arrow signs appear in the corners of the button. Right now, they are black, but we’re going to replace that color with the page background color. Just update the color codes in the span styles accordingly.

    So, you can see that there are so many steps to make your favourite animated button in WordPress. But, if you are not a coder and not interested in doing this hassle, there is an easy way. Go to the next method.

    Method 2: Add Button Animation Using BWD Creative Buttons Elementor Addon

    You can make any kind of animated button using the BWD creative buttons elementor addon. You can choose from 100+ styles and can customize your own color and styles.

    Just download and install the plugin and start doing your customization. Buy the plugin now.

    button animation addons in elementor

    Installation Process

    • Install BWD Creative Buttons Elementor Addon using WordPress plugin installer or by uploading its files into the WordPress plugins directory.
    • Activate the BWD Creative Buttons Elementor Addon through WordPress Plugins menu.
    • Click the Plugins => Add New
    • Click Upload Plugin and then Choose the bwd-creative-buttons.zip from your computer then click on the Install Now button.
    • After activating, it doesn’t work without Elementor Page Builder plugin. Firstly, you should activate Elementor Page Builder.
    • To activate newly installed plugin navigate the Plugins => Installed Plugins.
    • Find the BWD Creative Buttons plugin from the list and press/click Activate.
    • Congratulations! plugin has been installed and activated on your website.

    Check different styles of buttons and choose the style you want. Simple!

    You can also check our BWD Elementor Addons Bundle here.

    Download the Code File.

    [lead-magnet id=”5″]
  • How To Make Attractive Service Box Section in WordPress (2 Ways)

    How To Make Attractive Service Box Section in WordPress (2 Ways)

    This guide explains how to create a service box section in WordPress, which is a visually appealing way to present your services, features, or offerings on your WordPress website. The guide is helpful for business owners, freelancers, and bloggers.

    Method 1: Service Box Section in WordPress Using Elementor and Custom Coding

    This tutorial will utilize the complimentary “Hello Elementor” theme and its premium version, “Elementor Pro.”

    • First, we’ll create a new page.
    • Then, insert a container.
    image 22
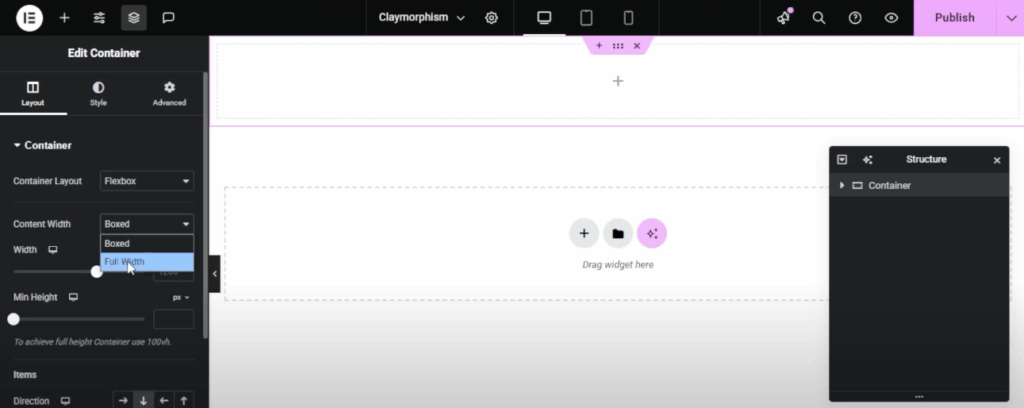
    • Make the content span the full width of the container.
    image 24
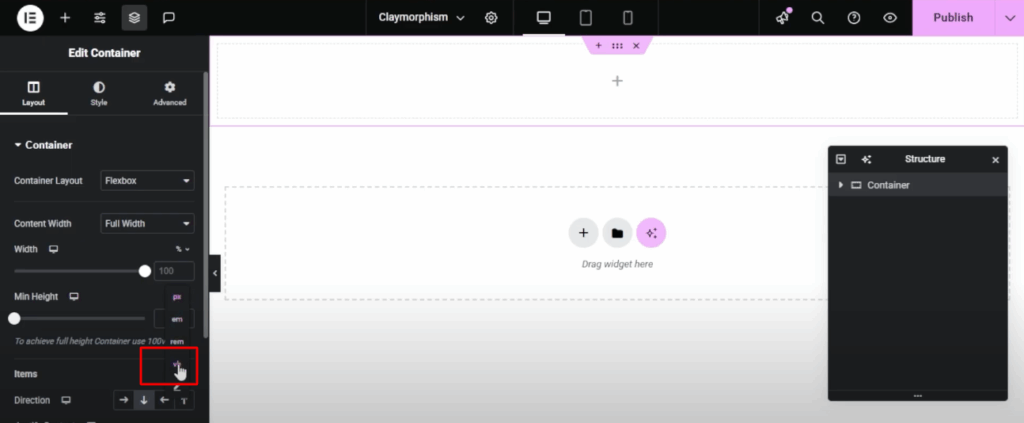
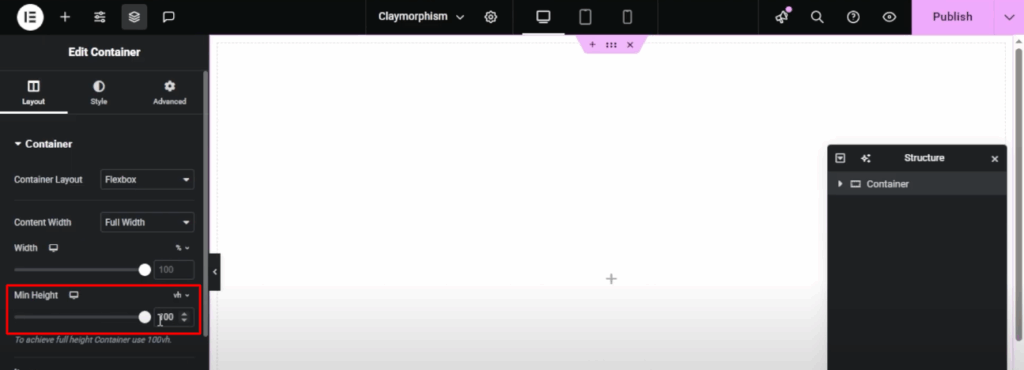
    • Change “Minimum Height” to “Viewport Height (VH)” and set the value to 100.
    image 25
    image 26
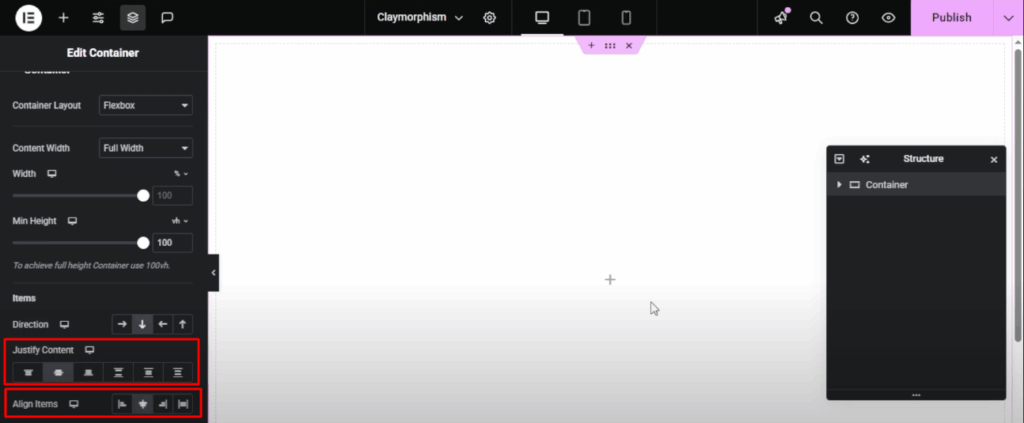
    • Select “Center” from both the Align Items and Justify Content options.
    image 27
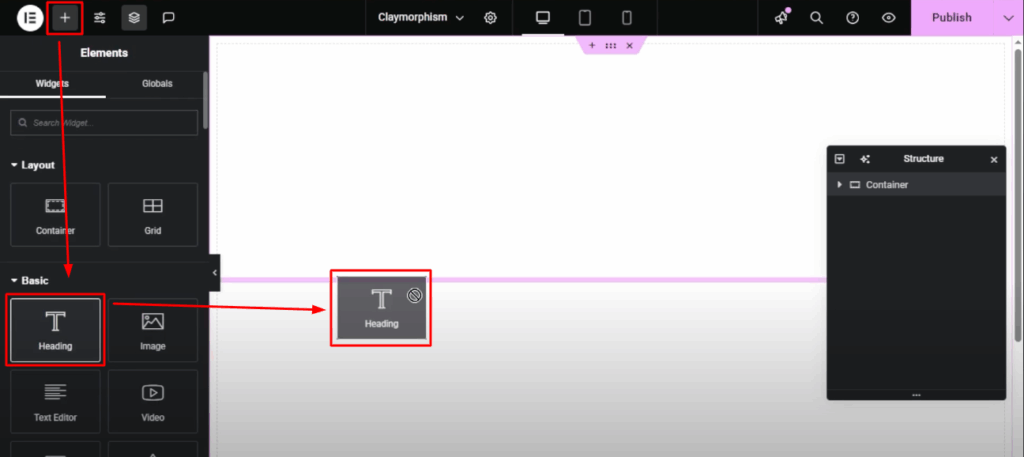
    • Click on “Add Elements”, then drag and drop a Heading element onto the main page.
    image 28
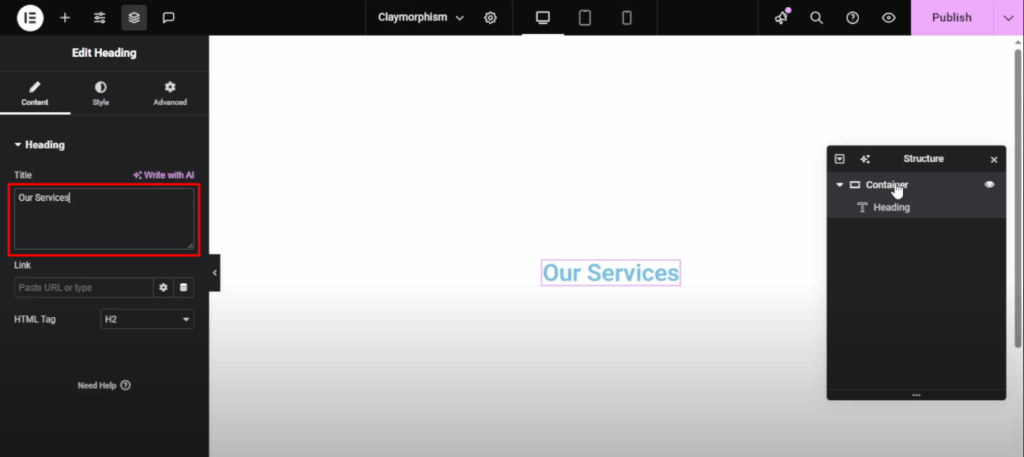
    • Give it the name “Our Services.”
    image 29
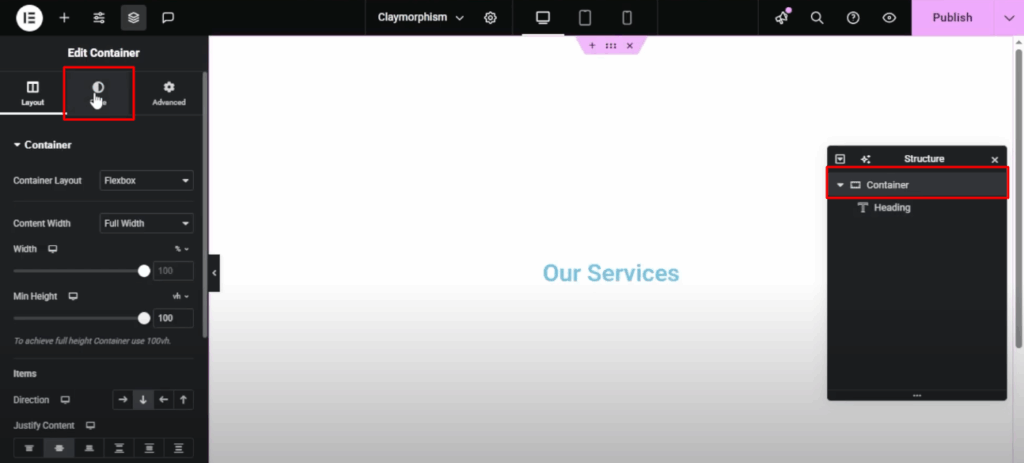
    • Then, navigate to the Style settings and choose the primary container.
    image 30
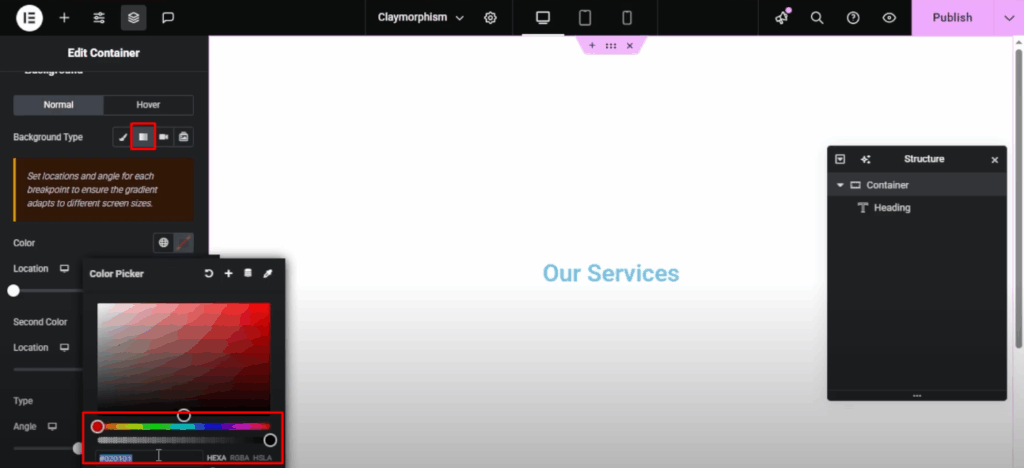
    • Use a gradient color for the background. The specific color codes are available in the description.
    image 31
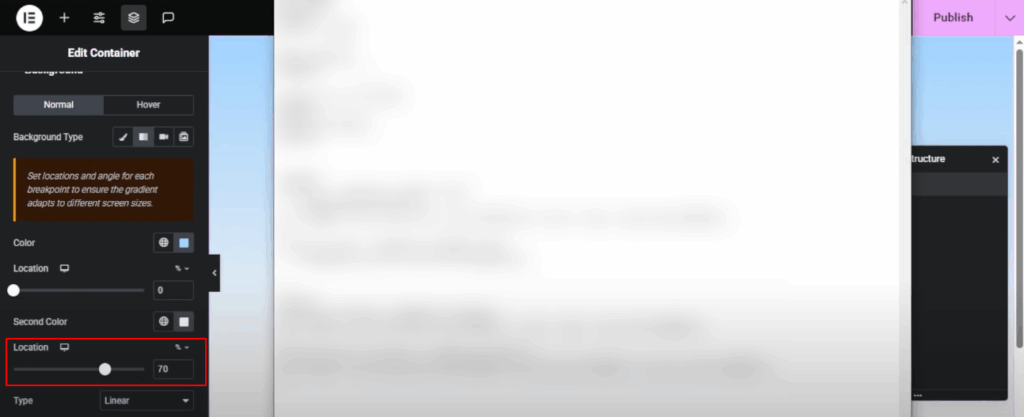
    • Position the second color at 70.
    image 33
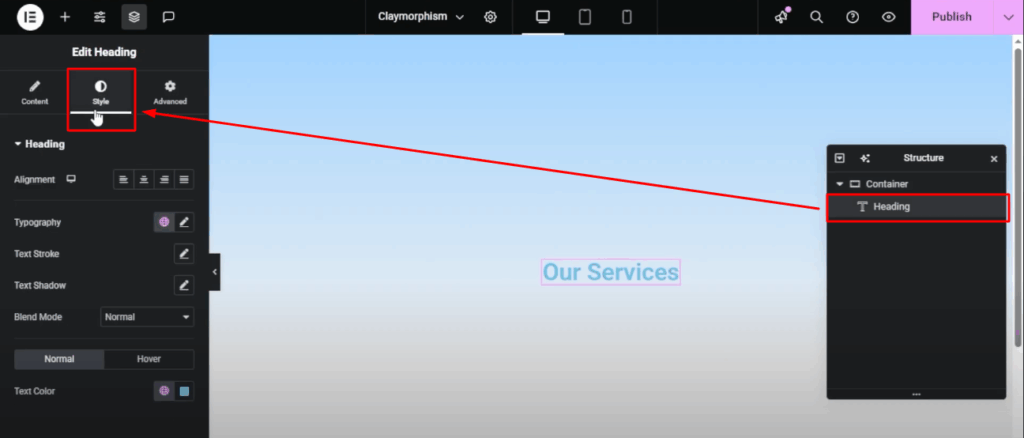
    • Return to the “Our Services” heading and navigate to the Style settings.
    image 34
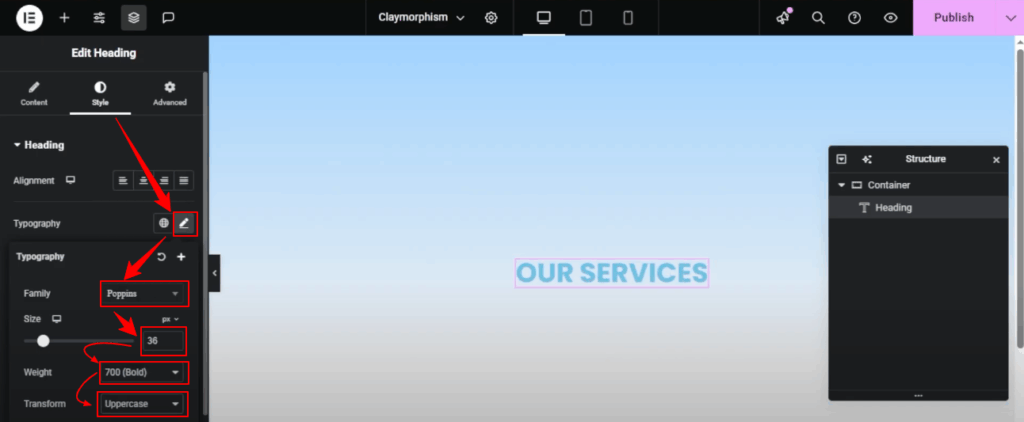
    • Select Poppins under Typography. Then, set the font size to 36, the font weight to 700 or 800 (Bold or Extra Bold), and change the text transform to Uppercase.
    image 36
    • Change the heading color to transparent and use a stroke color instead. Then, adjust the letter spacing to 2 pixels.
    image 38
    image 37
    • Choose a color from the description section and adjust the stroke size to 1 pixel.
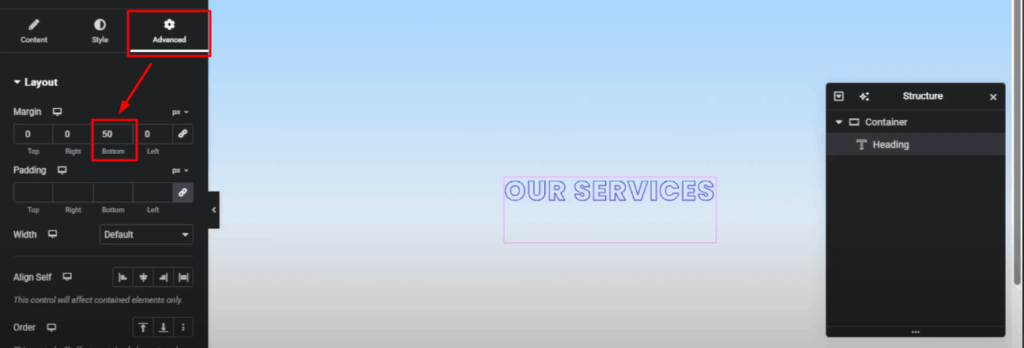
    • Then, adjust the bottom margin to 50 within the Advanced settings.
    image 39
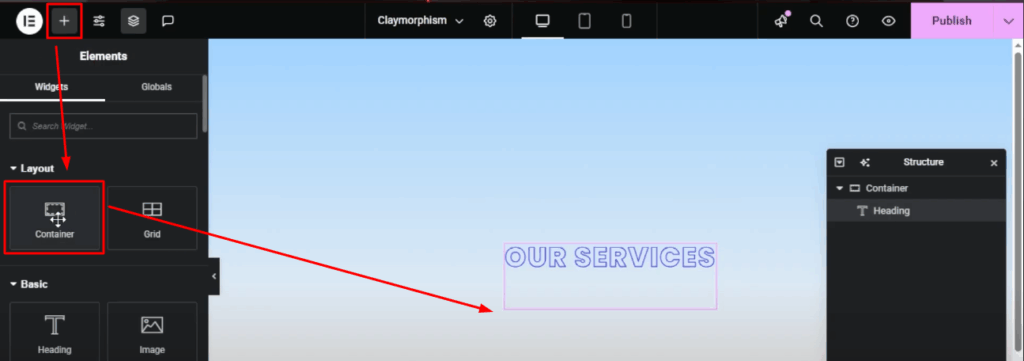
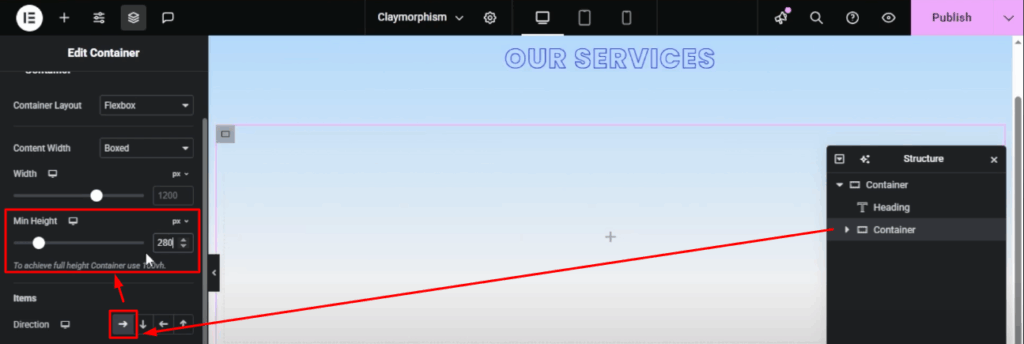
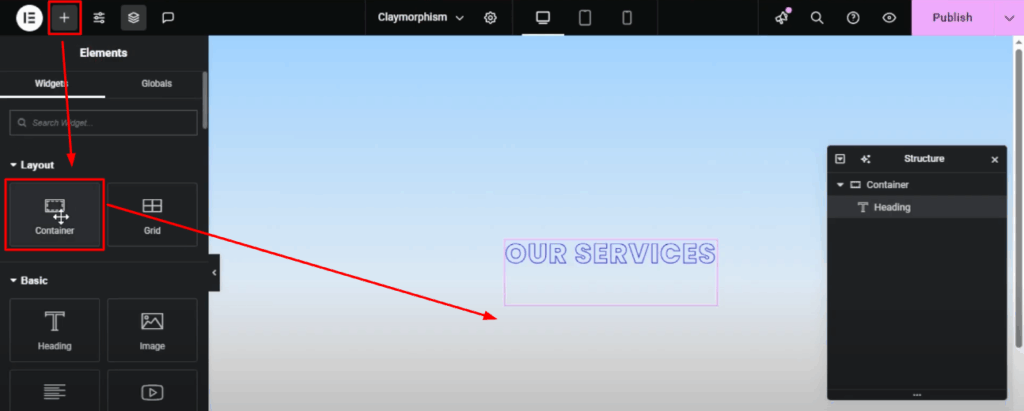
    • Next, include a new container and adjust its settings. Set the Direction to Row – Horizontal and establish a minimum height of 280 pixels.
    image 40
    image 41
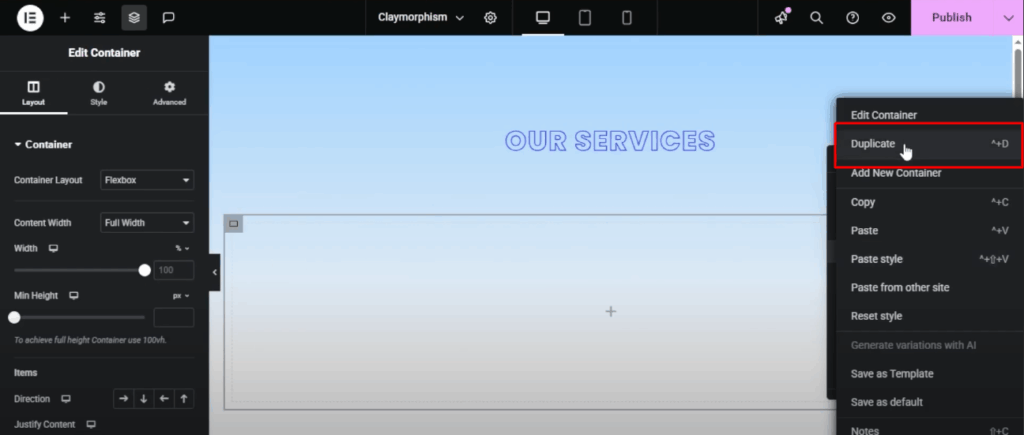
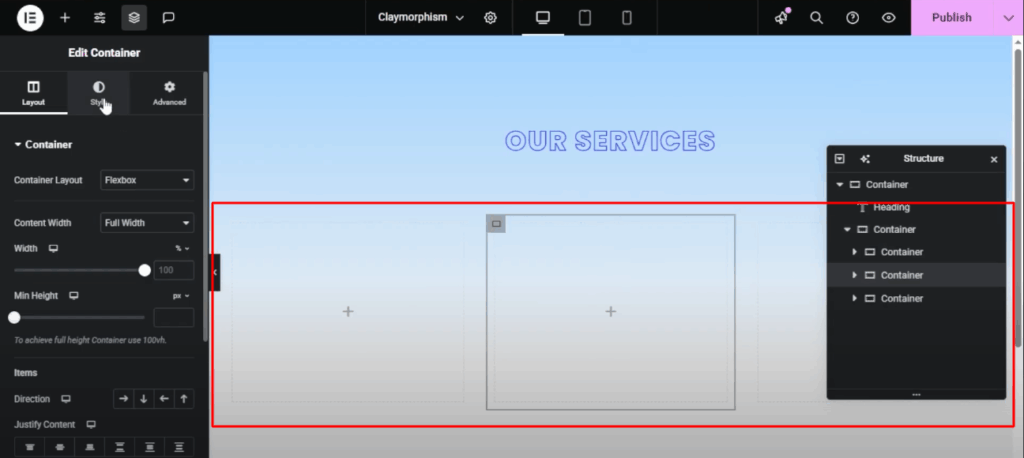
    • Add three sub-containers to create the inner columns. Then, navigate to Style and center both Justify Content and Align Items.
    image 42
    image 43
    image 44
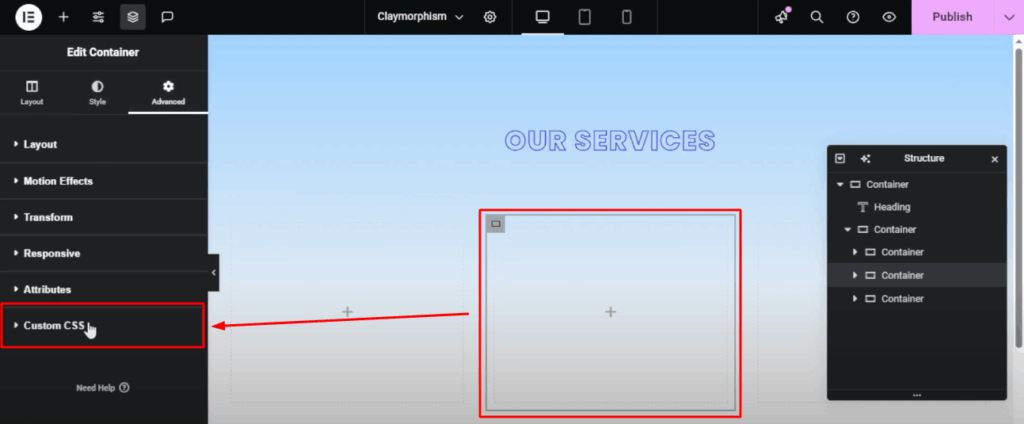
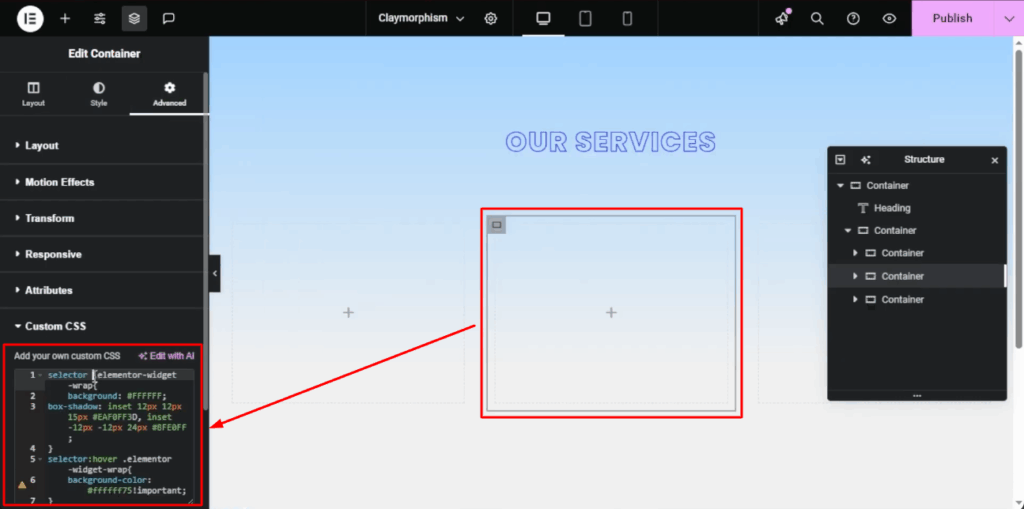
    • Now, we will apply custom CSS. Locate the code in the file provided below. Choose the middle sub-container, navigate to Custom CSS, and insert the code.
    image 45
    image 46
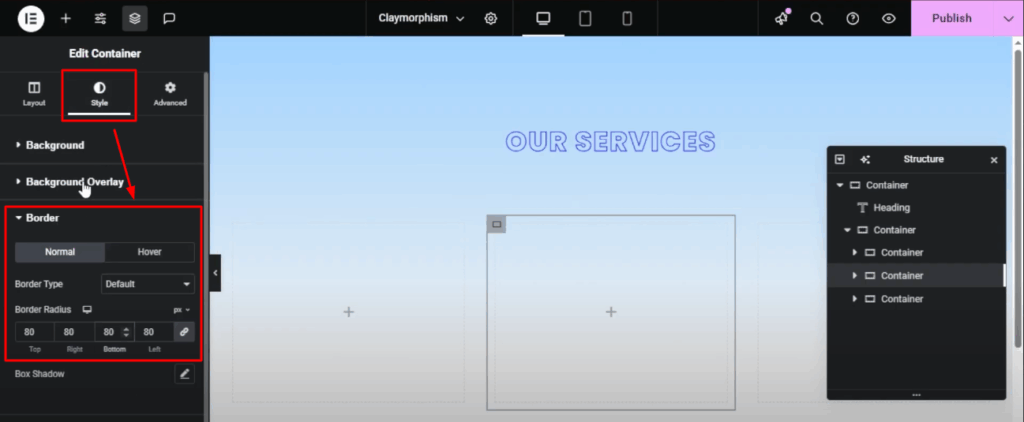
    • Round the corners by setting the border radius to 80 for all sides.
    image 47
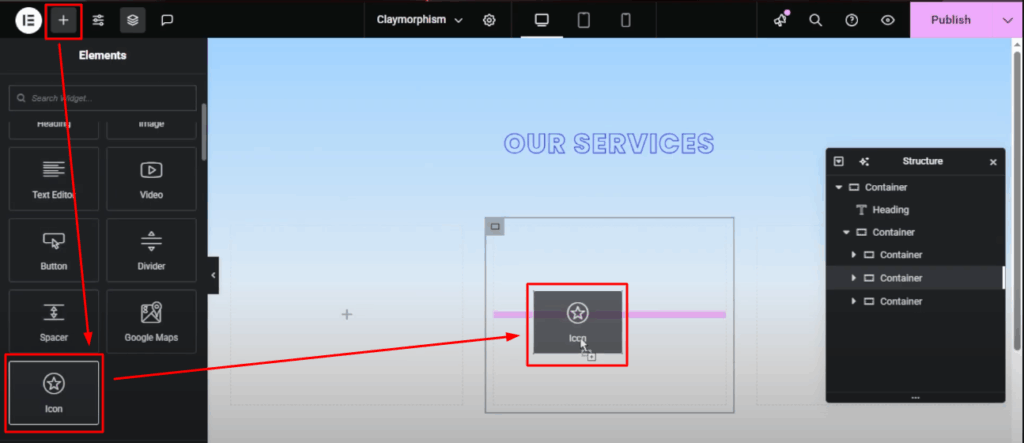
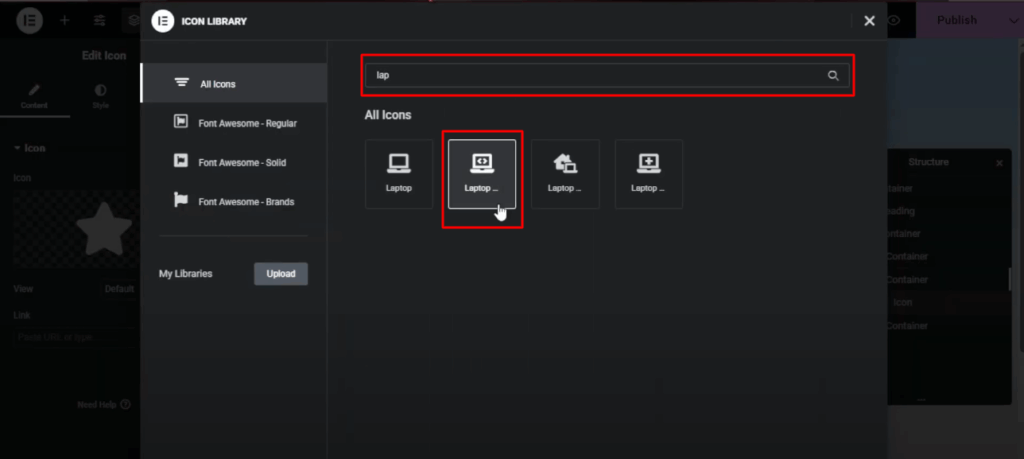
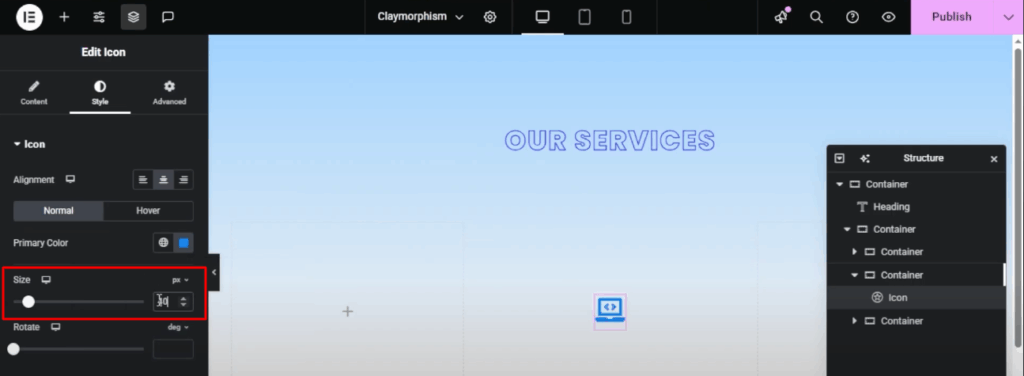
    • Next, insert a laptop icon, adjust its color to your preference, and modify its size to 40 pixels.
    image 48
    image 49
    image 50
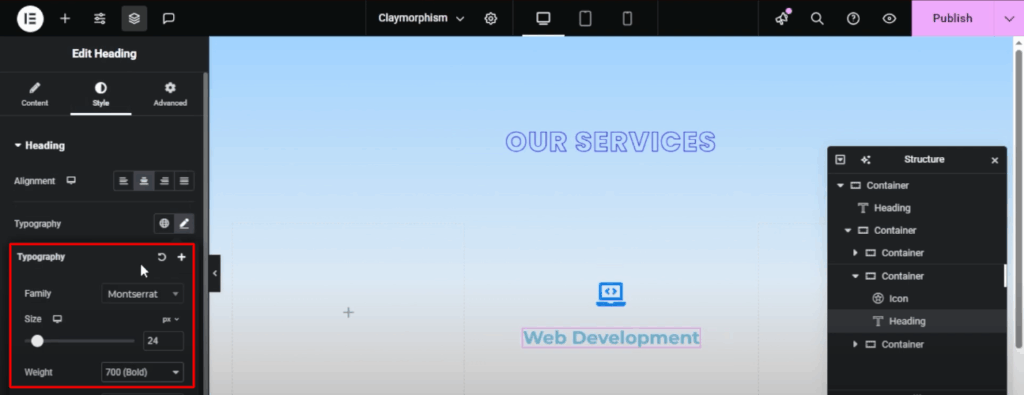
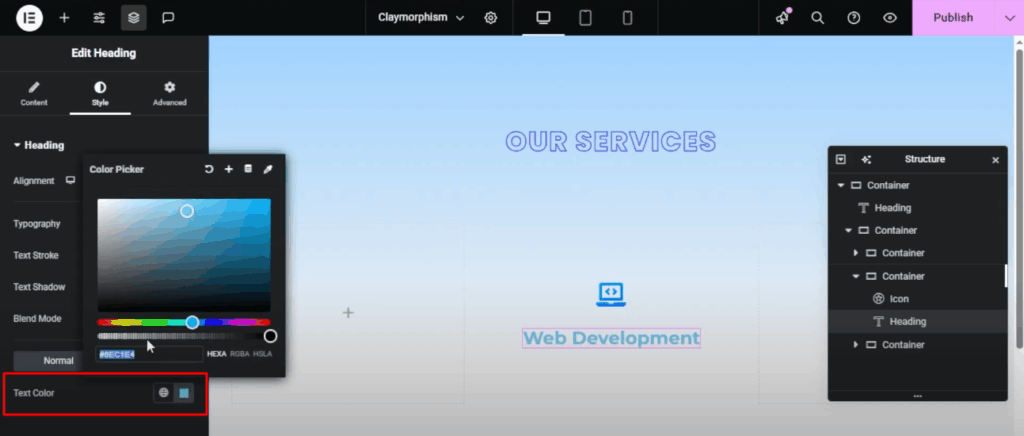
    • Change the heading to “Web Development”. Use Montserrat, 24 point, Bold and update the color.
    image 51
    image 52
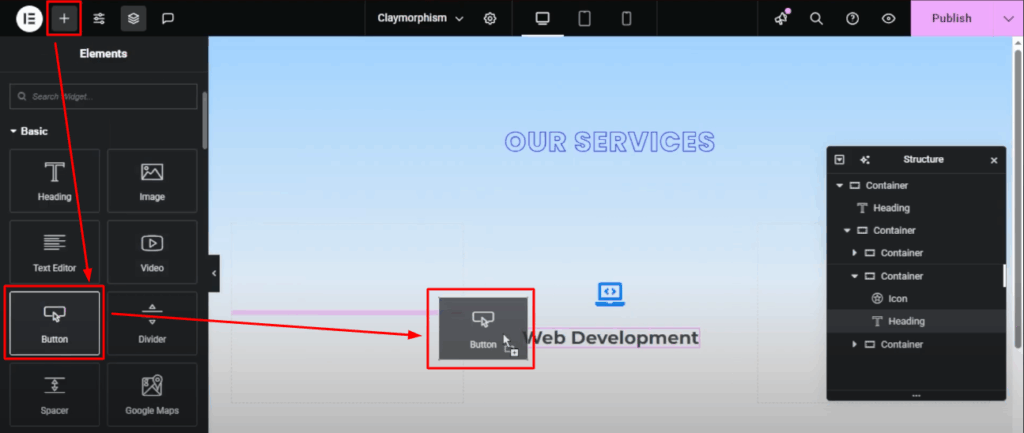
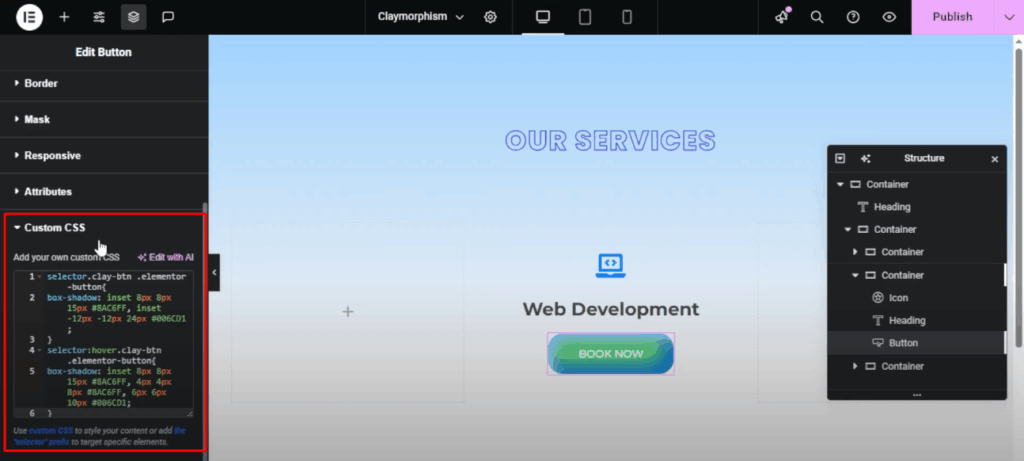
    • Add a Button Widget next. The CSS code for this can be found in the file below.
    image 53
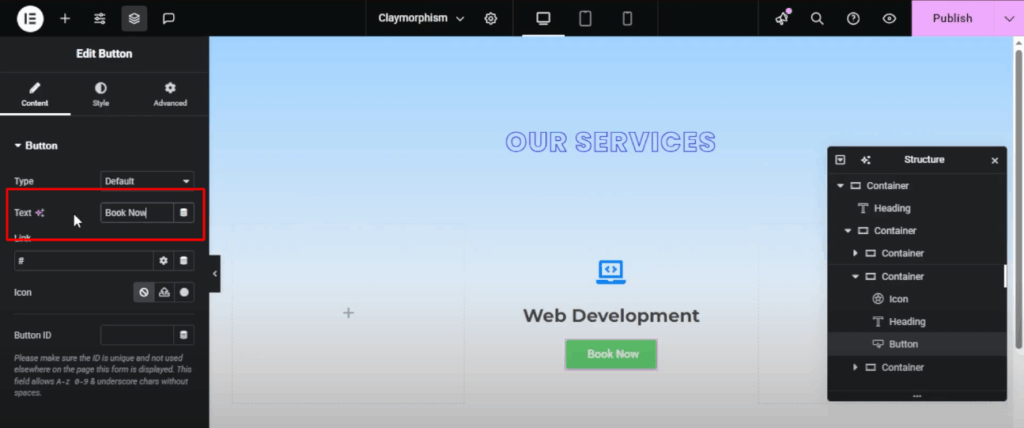
    • Make the button text “BOOK NOW” in uppercase Montserrat font at 14 pixels.
    image 54
    image 55
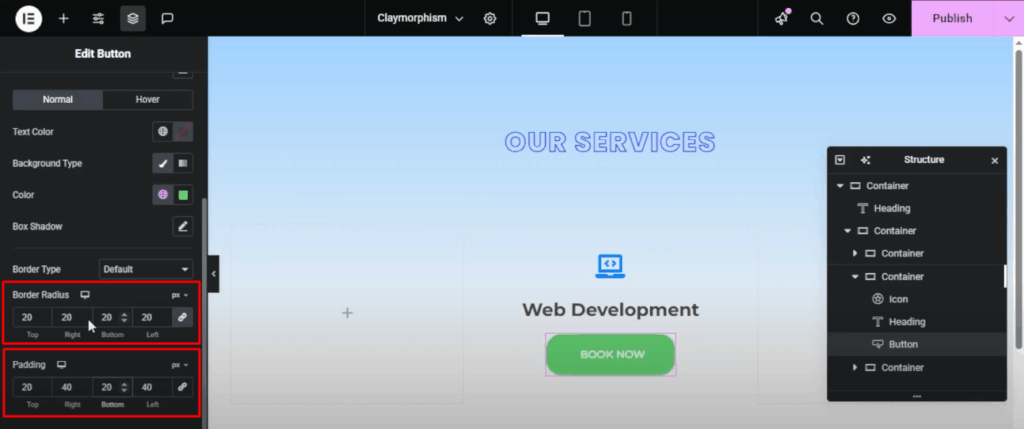
    • Adjust the padding to 40 pixels on the left and right, and 20 pixels on the top and bottom. Then, set the border radius to 20 pixels.
    image 56
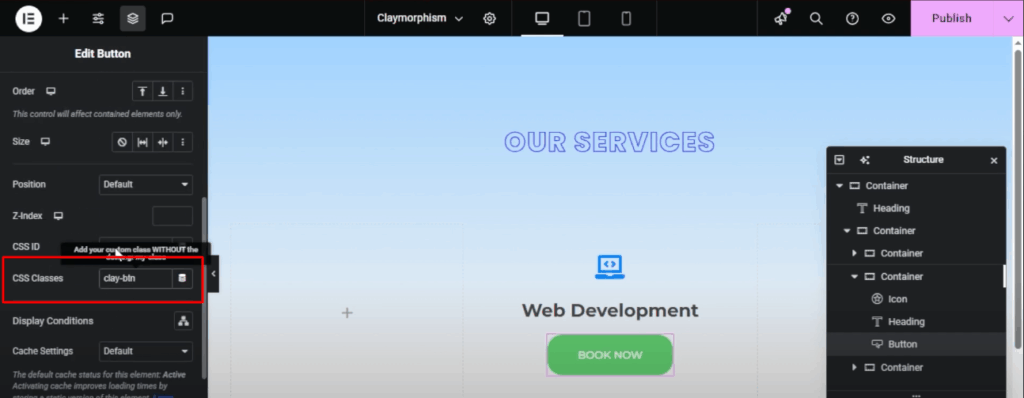
    • Then, just add a separate class called “Clay BTN” to that button. Change the background color and pop in the CSS I gave you.
    image 57
    image 58
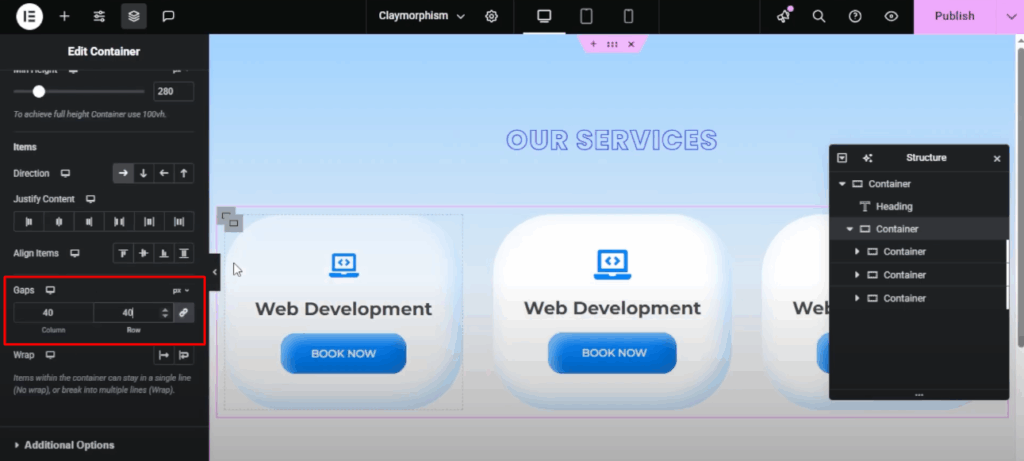
    • Next, add some spacing between the inner columns by duplicating the sub-container. Change the current gap to 40, as it is too small.
    image 59
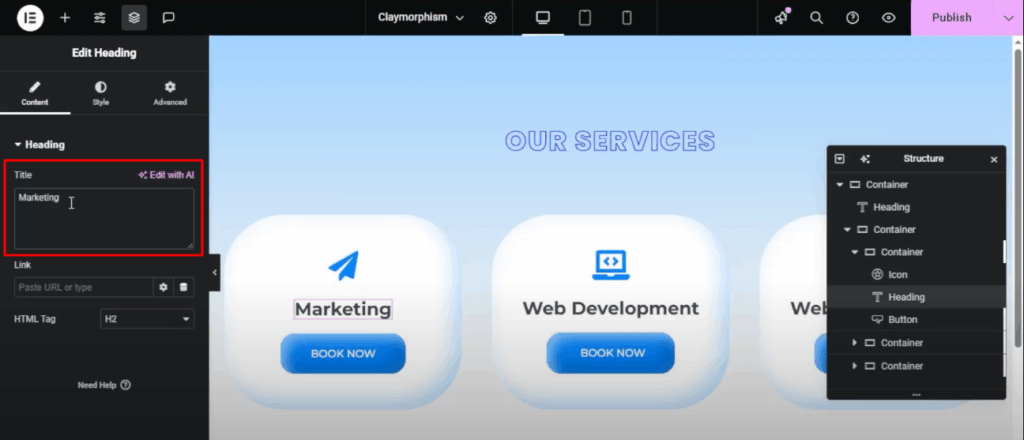
    • Change the titles, icons, and text to match the services you provide, such as Marketing or SEO.
    image 60
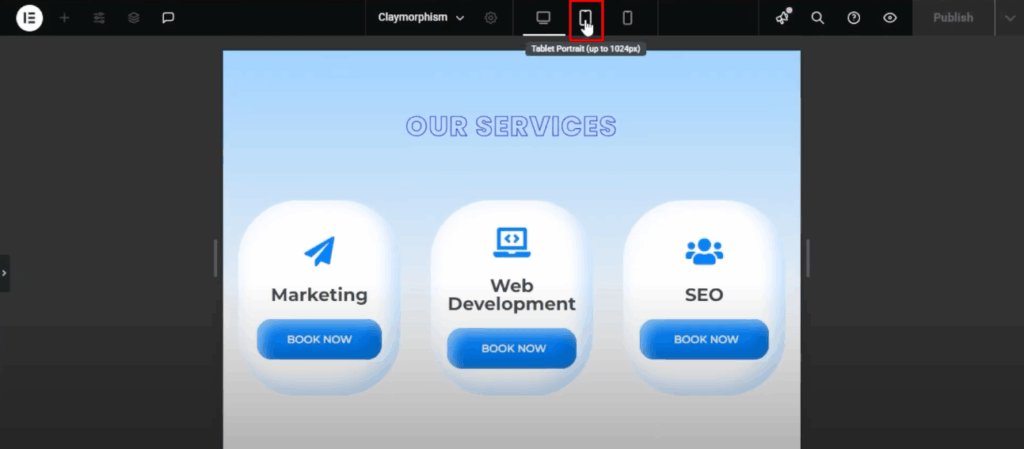
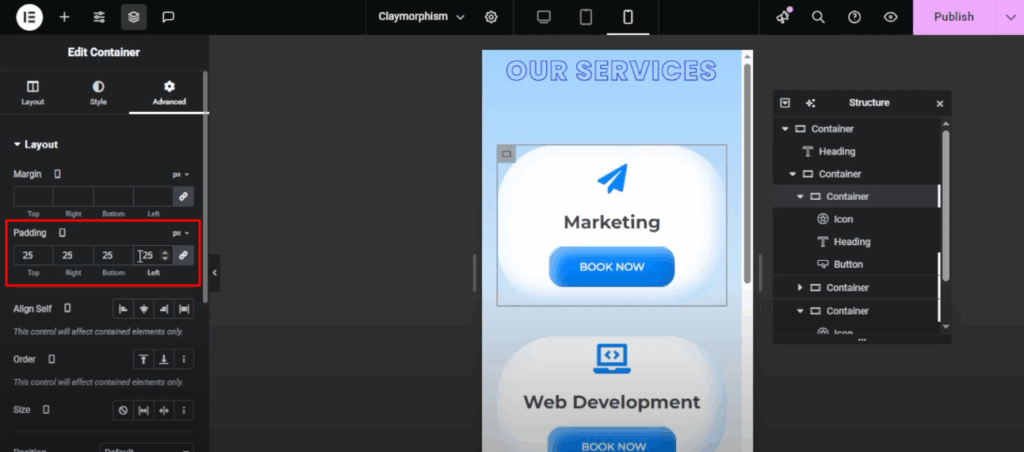
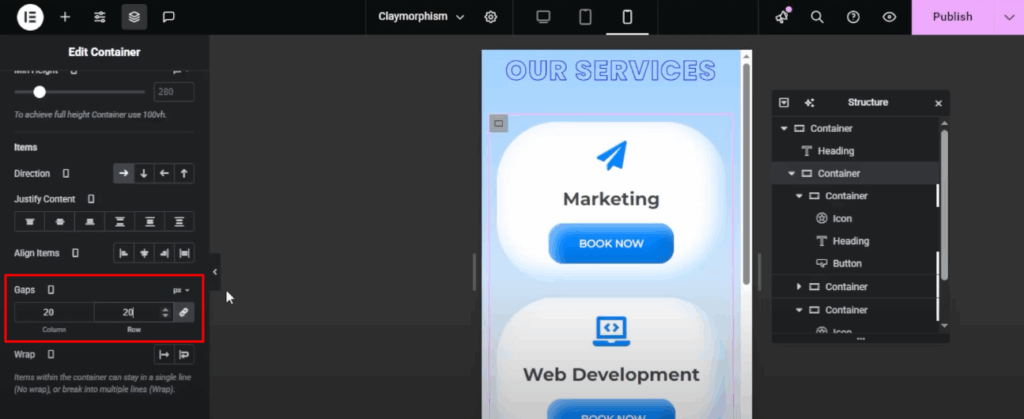
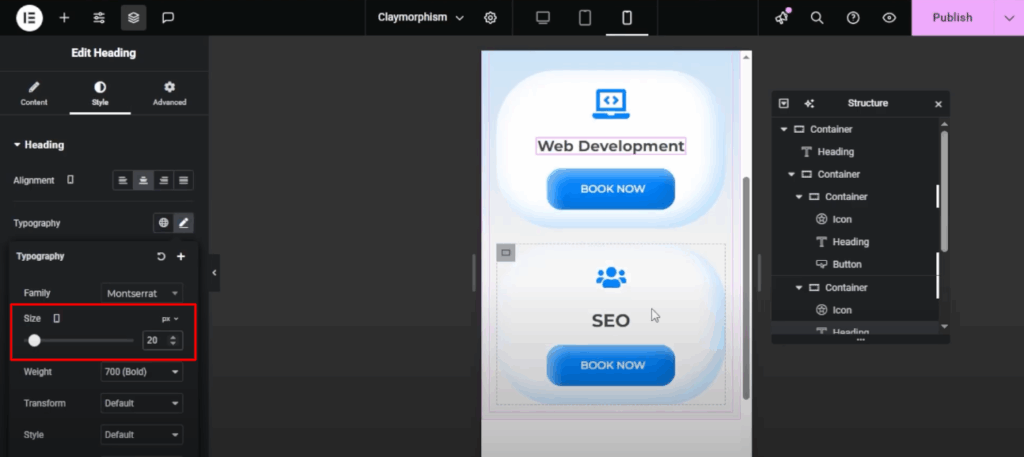
    • Next, check the layout on different screen sizes. For mobile view, adjust the column padding to 25 pixels and set the gap to 20 pixels.
    image 61
    image 62
    image 63
    • Decrease the heading font size to enhance the mobile view.
    image 64

    These are the required steps if you want to customize manually with some CSS coding. However, there’s a less stressful alternative.

    Method 2: Service Box Section in WordPress Using BWD Services Showcase Addons for Elementor

    You can do all of these customizations by just installing BWD services showcase addons for Elementor. Just download and install the plugin and start doing your customization. Buy The Plugin.

    Installation Process:

    • Install BWD Services Showcase Elementor Addon using WordPress plugin installer or by uploading its files into the WordPress plugins directory.
    • Activate the BWD Services Showcase Elementor Addon through WordPress Plugins menu.
    • Click the Plugins => Add New
    • Click Upload Plugin and then Choose the bwd-services-showcase.zip from your computer then click on the Install Now button.
    • After activating, it doesn’t work without Elementor Page Builder plugin. Firstly, you should activate Elementor Page Builder.
    • To activate newly installed plugin navigate the Plugins => Installed Plugins.
    • Find the BWD Services Showcase Elementor plugin from the list and press/click Activate.
    • Congratulations! plugin has been installed and activated on your website.

    Check different styles of service showcases and choose the style you want. Simple!

    You can also check our BWD Elementor Addons Bundle here.

Loading...